How to Do A Brake Job the Right Way
Why do we need another article on doing a brake job? This article will give you the know-how and numerous tips to help you solve common braking issues on today’s vehicles. In this article, I will give you professional advice and technician-accredited tips that we’ve been using at our shop for years. Hopefully, whether you’re a driver, do-it-yourselfer, or technician, these steps and tips will help you make the right decisions when it comes to addressing brake repairs on whatever vehicle you’re driving or working on.
One of the first things you need to start with is why your vehicle needs brake repairs in the first place. At the risk of minimizing your technical expertise, no matter what level you are at, I believe it’s important to first nail down the reason behind the brake job.
On the one hand, if you know you need brake repairs because you’ve done a brake inspection and have verified that brake pad thickness is low – anything under 2 mm is critical – then the reason is obvious, maybe. In this case, you’ll find this article to be chock full of, not only basic instructions, but tips and tricks to make the brake job go easier.
On the other hand, if you are considering brake replacement because of “something else,” such as brake pedal pulsation, vehicle pulling left or right while braking, or brake pedal too soft or too low, then you definitely need to read this article. Brake replacement might fix the problem, but if you don’t understand the problem in the first place, you may only be treating a symptom, wasting time and money in the process – you’ll soon be re-considering brake replacement.
Test Drive Observations
Let’s start with a test drive. Though you might have years of test driving under your belt, or you’re just a DIYer or driver, you need to learn to listen to your brakes. If you’re changing brakes because you’re hearing brake noise, there are several things that can cause brake noise, such as debris stuck in the pad material, glazed brake pads, or something wrong with the surface of the rotor. Of course, it could just be because the brake pads have worn down and the warning device is contacting the rotor.
While test driving, feeling your brakes can be just as important as hearing your brakes, and you’ll want to feel how much pressure the brake pedal requires to slow the vehicle, what kind of feedback you get from the pedal, such as sponginess or pulsation, and how the rest of the vehicle behaves when braking, such as pulling to one side or shaking in the steering wheel.
The test drive will also give you important information regarding location, which can narrow down where you’ll need to look to diagnose the problem. When describing location, keep in mind “front” refers to well, the front, and “left” refers to the driver’s side, so “right rear” refers to the passenger side rear. Obviously, if you’re hearing noises from the front brakes, you won’t go inspecting the rear brakes, at least not at first, because it’s good to note front and rear brakes are part of the same system and affect each other’s performance.
Inspect and Identify
“Doing the brake job,” such as replacing brake pads or resurfacing brake rotors, is not the first step, not even the second step. After test driving and localizing the problem, more inspection is needed to positively identify the root cause of the problem. Will this take more time than simply slapping new parts onto the vehicle? Absolutely, but not nearly as much time as doing it all over again because you missed some important detail the existing brakes were trying to tell you.
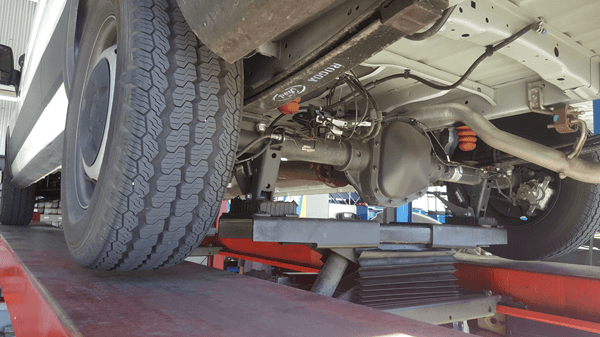 Before disassembling the brakes, lift and support the vehicle and remove the wheels. Always support the vehicle on jack stands or set it on the lift locks, and never put any part of your body, such as important hands, feet, or brains, under a vehicle supported only by a jack. Remember, a jack or lift is a “lifting” device, not a “holding” device. With the wheels removed, it’s probably a good idea to put a couple wheel nuts back to hold the rotors in place.
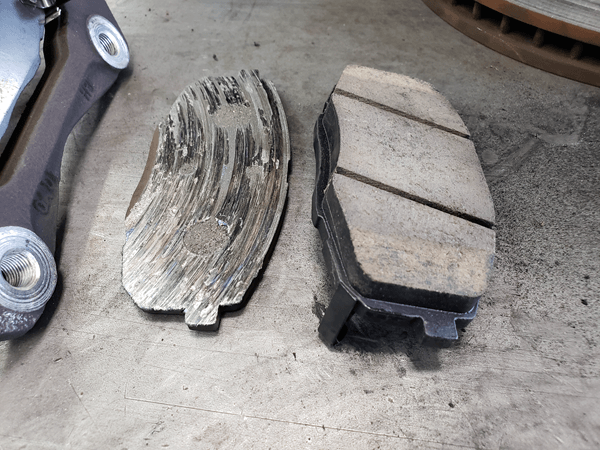
Check the brake rotors for signs of overheating (blue spots or sections), grooving, cupping, rust, or cracks. 
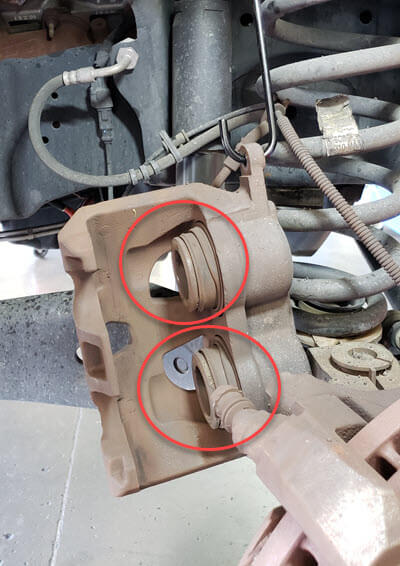
Use a flashlight and inspection mirror to check the brake pads. Look for common problems, such as excessive wear, less than 1 mm friction material remaining, abnormal wear, such as inboard brake pads markedly thicker or thinner than outboard brake pads, or one end of the brake pad thicker or thinner than the other. Be sure to check both the inboard and outboard brake rotor faces, as these can be markedly different.
Comparing inboard to outboard brake pads, abnormal brake pad wear could indicate a brake caliper slider or piston problem. Comparing leading edge to trailing edge of a brake pad could indicate a brake caliper piston or slider problem, as well as clearance problems between the brake pad and the retainer pins. A complete brake job would include cleaning and lubricating caliper sliders and removing rust scale from retainers and spring clips, to ensure even application and release of brake force. Similarly, cleaning brake pad guide pins and retainer pins ensures brake pads don’t drag on the rotor when unapplied.

Careful observations during disassembly can help you determine the cause of brake noise, as well. Overheated brake rotors, glazed brake pads, or contaminated friction surfaces can make noise, as well as can shifted spring clips, retainers, or brake pad spreaders. Embedded debris can be removed, if there is sufficient friction material remaining, at least 5 mm, by scuffing and sanding the brake pads. Brake pads and rotors can be washed with a soapy solution to remove oil, grease, or brake fluid contamination. Replace bent or broken retainers to eliminate looseness.
A thorough initial inspection and accurate observation could help you restore quiet and efficient braking without spending time on unnecessary repairs or money on unnecessary parts. In the end, this is a more efficient use of your time and money.
Caliper and Rotor Removal
There are 3 common brake systems on passenger vehicles. Fixed brake calipers are usually found on performance cars and a few trucks, while sliding brake calipers typically can be found on European vehicles. Floating brake calipers are the most common, found on almost every vehicle on the road today. All 3 brake calipers operate on similar principles, though there will be differences in disassembly, maintenance, and repair. In this article, we’ll be discussing the most-common type, floating brake calipers, but it does one good to note this is far from a technical manual. This guide is a good way to start, and you’ll find plenty of helpful tips, but you’ll have to refer to a repair manual, for your year, make, and model (YMM) for detailed instructions and specifications.
To remove the brake caliper, without going into actual brake caliper replacement, you’ll need to depress the pistons first. It used to be common practice to simply compress the pistons and force the brake fluid back 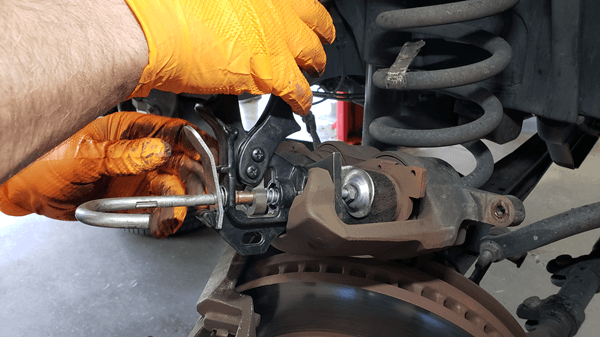 into the brake lines and brake master cylinder, but this is not a good idea on modern brake systems. To prevent contaminated fluid from damaging sensitive modern valving systems, use a hose pinch tool on the flexible brake hose. Then attach a hose to the bleeder valve and open the valve. Use a brake caliper piston compression tool to push the pistons back into their bores, forcing brake fluid out the bleeder valve into a bottle. Finally, close the bleeder valve and remove the hose pinch. Rear brake calipers with integrated parking brake mechanisms require a slightly different tool and procedure, but the idea is the same.
Once you remove the brake caliper mounting bolts, do not allow the caliper to hang from the flexible line, which can damage it. Use an S-hook, bungee cord, or mechanic’s wire to hang the brake caliper from some other solid perch, such as the suspension or body.
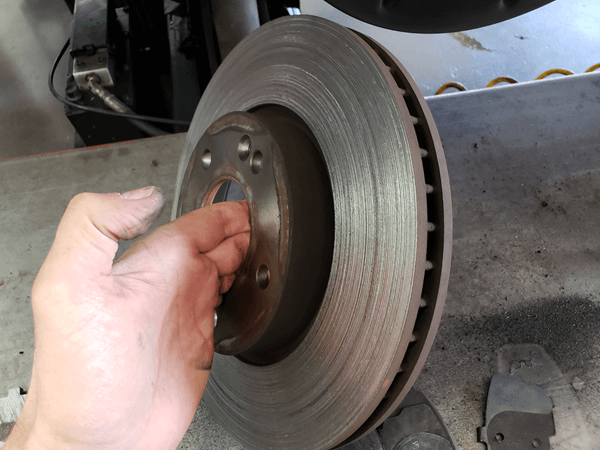
With the brake caliper removed, removing the brake rotor may be as simple as pulling it off by hand, though some are held in place by small bolts or retainer clips. Still, even with retaining hardware removed, some 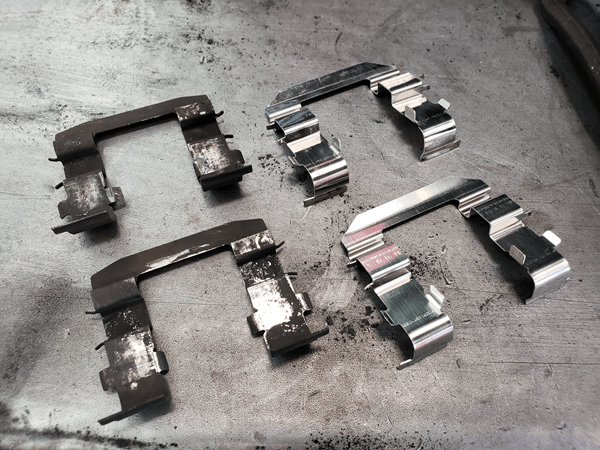 brake rotors are extremely difficult to remove. Some brake rotors feature threaded holes which can be used to force the rotor off. If you plan on reusing the brake rotor, resist the urge to hammer the disc portion. Often, striking around the rotor’s center hold is enough to loosen it, but be careful not to damage the wheel stud threads.
Most-common on trucks, the brake rotor may be attached to the wheel hub and bearing, which requires further disassembly to remove the bearings to get to it. Without getting into specifics, the general idea is to remove the bearing cap and castle nuts to release the bearings from the wheel spindle. On assembly, the hub should rotate with little resistance, without any play. Refer to your YMM-specific repair manual for instructions on repacking the wheel bearings and achieving the correct bearing preload and castle nut torque.
Rotor Inspection
After removing the brake pads and the brake caliper, inspect the brake rotor. Use a micrometer to measurements the thickness of the rotor, in at least six places, in the middle of where the brake pads run. A brake rotor micrometer will give you better access, especially if the rotors have a ridge or lip, and help you check for brake rotor tapering, where the inner edge is thinner or thicker than the outer edge.
These measurements are important because brake rotors cannot be used if they go under the minimum thickness, especially after accounting for any material to be removed on resurfacing it. If the rotor is under the minimum thickness specification, usually stamped on the rim or hub, or it will go under during resurfacing, then it will need to be replaced. Never assume the brake rotor can be reused, especially if you don’t know the history of the vehicle. Always be sure by checking brake rotor condition and measurements.
The entire function of the brake system is to convert your car’s kinetic energy into heat energy, and the heavy brake rotor is a critical component, specifically designed to absorb and release heat. The amount of heat a brake rotor can safely absorb is directly proportional to its thickness. This explains why rear rotors are significantly thinner than front rotors, as rear rotors are only responsible for about 30% of braking, and so generate much less heat.
When brake rotors are used and machined, they gradually lose material and their ability to hold and dissipate heat. Rust also impedes the rotor’s ability to dissipate heat. When rotors absorb too much heat, they materially change, which causes braking problems, usually what we notice as abnormal noises and braking sensations.
Replace or Resurface?
When doing a brake job simply to replace worn brake pads, you might be able to reuse the brake rotor, but you should never skip machining or resurfacing the rotors – a “pad slap” job. The new brake pads need a flat surface for efficient bedding-in and braking performance, which simply can’t be achieved without resurfacing the rotors.
 A couple of conditions may require brake rotor replacement, even if it is within thickness tolerances. Cracks, checks, heavy rust, and heat spots, visible as blue-colored tempered areas of the rotor facing, cannot be machined out, requiring brake rotor replacement. Heavy rust in the vents can also inhibit heat dissipation and encourage overheating – replacement would be suggested. Scoring may be machinable, but it depends on the severity of the problem. Light scoring, caused by debris in the pad or catching it just in time before the rivets gouge the face, can usually be resurfaced with no problem. Heavy scoring, such as caused by neglected brake pad wear, cannot be machined, would also require brake rotor replacement.
Some inexperienced shops and technicians will attempt to machine overheated rotors, but this often creates future problem. Overheating fundamentally changes the properties of the metal, and machining does not remove these brittle spots in the brake rotor.
Replacing Rotors
If you need to replace the rotors, there are many brake rotor replacement options available, but don’t simply choose the cheapest option. The adage, “you get what you pay for,” certainly applies when it comes to choosing replacement brake rotors. You can usually safely go with genuine (automaker branded) or original equipment manufacturer (OEM) brake rotors, but you may consider aftermarket brake rotors, of which cost, utility, and quality may vary.
To maintain the braking performance and efficiency you’re accustomed to, consider exact-fit genuine or OEM brake rotors, which will have the same heat and braking characteristics as from the factory.
Some aftermarket rotors are inexpensive, which can save money on the brake job but may not deliver quite the same performance as genuine or OEM. Such “cheap” rotors will fit and do the job, but may overheat more readily or wear out quicker, being mass-produced from possibly-inferior materials.
Other aftermarket brake rotors are more expensive, but built of superior materials and engineered to exceed factory specifications. You can often find such brake rotors to enhance braking performance in sports cars and trucks that are used for towing and hauling.
If replacing brake rotors is required, be sure to clean the new rotors with soapy solution to remove any rust inhibitors, basically lubricants, which would quickly contaminate the friction surface of the new brake pads.
Machining Rotors
There are two kinds of brake lathes, on-car and bench-type. Many automotive repair shops and brake shops have both, but on-car brake lathes are the standard in accurate brake rotor resurfacing. Because on-car 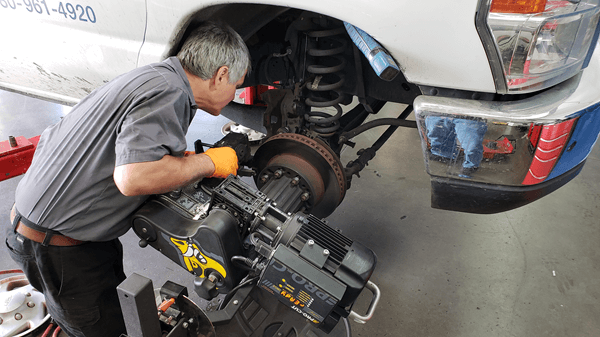 brake lathes are mounted on the car, in place of the brake caliper, it can machine the rotor to exacting tolerances and, at the same time, compensate for runout.
Bench-type brake lathes have been in use for decades, and are still a good alternative to the on-car brake lathe, as long as the wheel hub runout is within tolerances – I’ll go over the importance of rotor runout in a minute. On this machine, the brake rotor is mounted and cut independently of the vehicle, after which the rotor may need to be indexed to reduce or eliminate runout.
Thought DIYers typically don’t have access to such expensive equipment, they do have the option of looking for a machine shop who can resurface their rotors. At the machine shop, they’ll usually use a bench-type lathe, but some use machine-shop lathes, which usually results in a non-directional finish. This is important to note, because the other two brake lathes will result in a “record-player” directional finish, which must be addressed before reassembly.
After brake rotor resurfacing, use a sanding disc on a drill to remove the directional finish. Be sure to scuff the surfaces evenly around the inboard and outboard surfaces. This helps when bedding in the new brake pads and prevents pad clicking. New brake rotors usually come with a non-directional machine-shop finish. As before, clean with a soapy solution and allow to dry before reassembly.
Rotor Runout
Whether you replace or resurface brake rotors, always check for rotor runout, a critical brake measurement that can lead to future problems. Excessive rotor runout, over 0.002” (2/1,000ths inch or 0.05 mm) can lead to 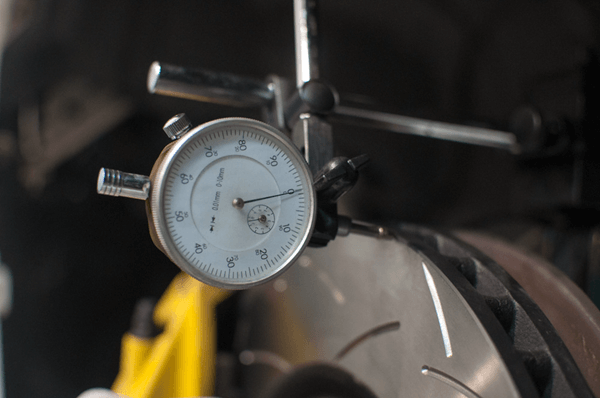
premature brake pad wear, hot spots, and pedal pulsation. Basically, when rotating, the brake rotor should not “wobble” side to side, but the only way to check this is with a dial indicator – if you can “see” wobble with the naked eye, this is a major problem!
To measure brake rotor runout, be sure the hub mounting surface is clean and the brake rotor sits flush to the hub. Use a powered wire brush or drill-mounted disc sander to remove rust and grime for a clean mounting surface. If reusing a resurfaced brake rotor, clean the back side of the rotor and the center hole in the same .png)
way. Hold the hub in place with at least 2 wheel nuts to keep it flat. You can use lug nuts turned backwards, flat side toward the rotor, spare nuts lying around the shop, or washers or spacers to keep the cones from being ruined. Torque the nuts as you would with the wheel installed.
Mount the dial indicator base to a solid mounting point, perhaps the shock mount or brake caliper bracket, and position the dial indicator contact point perpendicular to the face of the rotor. While rotating the brake rotor by hand, the dial indicator will read out the lateral movement of the rotor. Excessive runout, over 0.002”, could be caused by dirty mounting surfaces, damaged wheel hub, incorrect wheel nut torque (installed with an impact gun), or excessive buildup of brake pad friction material on the rotor facing.
Minimizing Runout
Interestingly, there is much debate in the auto repair industry concerning whether or not rotors “warp” from overheating. The simple truth is that overheating cannot change the shape of the brake rotor. Otherwise, race car brakes would always have this problem, as they develop significant amounts of heat going into corners at high speed. On a daily driver, getting brakes red-hot is practically impossible, anyway.
What really happens is caused by runout, depositing brake pad friction material on the high spots, increasing the thickness in that spot. At first, runout will simply shift the brakes left and right, without causing pedal pulsation. Eventually, once enough friction material is deposited, the thickness of the rotor fluctuates, causing pedal pulsation. Therefore, minimizing brake rotor runout is critical.
If measured runout exceeds 0.002”, you may be able to “index” the brake rotor to minimize it, taking advantage of small runout variations between the brake rotor and wheel hub. To index the brake rotor, first mark the rotor and a wheel stud and measure runout as normal. If runout is excessive, remove the rotor and reinstall it, but rotated by one or two studs. By indexing the brake rotor to the wheel hub, you can usually cancel out individual runouts and get an overall runout within specification. Mark the rotor and hub with permanent marker or paint pen in the proper location, so you can reinstall it, properly indexed, after cleaning.
If indexing can’t get runout under 0.002”, you may have another problem, such as a damaged wheel hub, bent axle, or defective brake rotor. Defective brake rotors aren’t impossible, but also not common.
Brake Pad Removal Inspection
If you need to, take several pictures of the brake before disassembling it. This will help when it comes to reassembly, to match up parts to their original locations.
Remove the brake pads and inspect them. Check for differences in thickness, such as inboard being thicker than outboard, leading edge thicker or thinner than trailing edge, or inner radius thicker or thinner than outer radius.
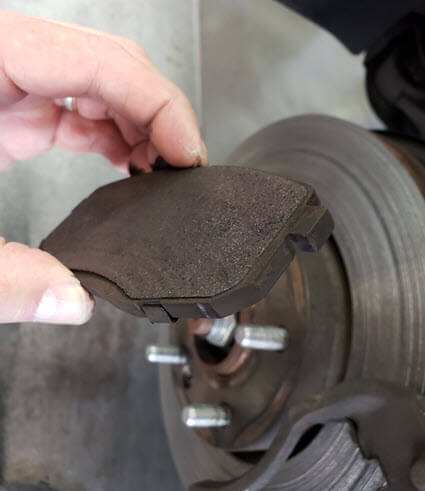
- If wear is even, inner to outer, front to back, top to bottom, there’s a good chance the caliper is operating normally and will require only basic cleaning and lubrication.
- If wear is uneven, there may be a fault in the brake caliper, such as a sticking caliper slider, brake pad, or slide pin. In this case, a little more attention to cleaning and lubrication may be all that is needed, or else the entire caliper may need replacement.
Remove spring clips and anti-rattle shims and inspect them. Check for wear, cracks or breakage. These typically don’t rust, but they get dirty and sometimes break. Replace any worn or broken parts with new, being sure to align new parts and old parts in their respective locations. You might want to simply replace all shims and springs as a matter of course, since they are inexpensive enough to add to the brake job.
Brake Caliper Inspection
 Inspect the brake caliper for leaks, which are usually obvious. Pay close attention to the caliper piston dust boots, which should be intact. Broken dust boots can allow dust and grime into the piston area, where it can damage the seal and cause leaks.
On sliding or floating calipers, you can use large channel-lock pliers and an old brake pad to compress the one or two pistons into their bores. On fixed monoblock multi-piston calipers, you’ll need a caliper compression tool or a couple of pry-bars to compress all four or six pistons simultaneously. Pressing on one piston at a time won’t work at all, and might actually force a piston out of its bore completely.
Caliper pistons should compress evenly and smoothly, without much force. Otherwise, this may indicate binding or sticking, which will translate to uneven compression and poor release after installation. If there are problems with the caliper pistons, replacement is suggested to prevent future problems. Rebuilt calipers are readily available for most vehicles on the road, at your local autoparts store.
Inspect the brake caliper sliders for sticking. On floating and sliding calipers, sliders and pins should move smoothly, by hand, and with very little force. If sliders are sticking, clean with a wire brush and lubricate with brake lubricant. If pins are seized, full brake caliper replacement may be necessary to restore proper braking and eliminate problems.
Climate plays a big role in caliper life. Here, in Tempe, AZ, our dry climate doesn’t affect brake calipers adversely, and calipers often last the life of the vehicle, upwards of 200,000 miles at least. In humid and coastal climates, salt and humidity can accelerate corrosion. In northern climates, road salt and deicing agents can also accelerate brake caliper corrosion. Brake calipers in these areas may never make it to the 100,000 mile marker.
Choosing the Right Brake Pad
Your original brake pads were formulated to match braking characteristics to the vehicle, so it’s usually recommended to choose genuine or OEM brake pads. Genuine and OEM brake pads will deliver predictable braking performance, wear, and noise. For instance, if your vehicle was factory-equipped with semi-metallic brake pads, semi-metallic brake pads would be the best choice to maintain current braking characteristics.
On the other hand, if you are experiencing dust problems, which can wreak havoc on your wheels, you may choose to go with low-dust replacement brake pads. This comes with a caveat, however, as emphasizing one characteristic will diminish another. For example, if you buy a low-dust brake pad, it will be cleaner, but it will also increase stopping distance and possibly cause more noise. Similarly, if you buy a low-noise brake pad, it may be quieter, but wear out faster and generate more brake dust.
In addition to genuine and OEM brake pads, there are dozens of aftermarket companies offering brake pads for every conceivable vehicle combination. It would be practically impossible to list them all, as well as to compare braking characteristics of each one. Usually, brake pad companies – brake rotor companies, too – list their brakes in 3 categories, perhaps 4, such as “Good,” “Better,” “Best,” and “Performance.” “Good” brake pads fit and work, but might be noisy or dusty or wear out quickly. “Performance” brake pads will give you great braking performance, but might not be necessary on a commuter car.
We suggest choosing at the higher end of the scale, to maintain or exceed factory braking performance. Really, if the difference between the two is $20 per axle, it doesn’t make much sense to sacrifice braking performance, cleanliness, lifespan, and safety for a measly $20, especially if you’re already saving a bundle by doing the brake job yourself.
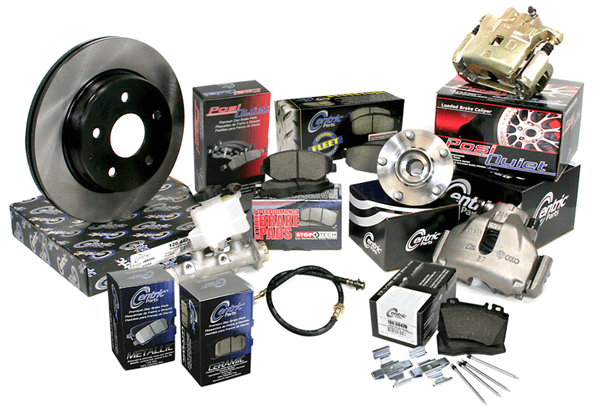 At Elite Auto Repair, we use Centric Parts replacement brake components, including brake rotors, calipers, pads, and hardware. Centric Parts is a leader in the field and has proven to be a quality product, consistently reliable, and is backed up by excellent technical support and warranty. Most of their brake calipers and brake pad sets come with new hardware kits, which saves time and money ordering extra parts.
Clean Up and Lubrication Tips
Before reassembly, clean all parts with warm soapy solution - clean brake calipers, brake rotors, wheel hub, backing plate, slide pins, bushings, bolts, hardware, spring clips, and retainer pins, as well. Once dry, you can proceed with lubrication and assembly. Lubricate only hidden parts, such as caliper slide pins, which are 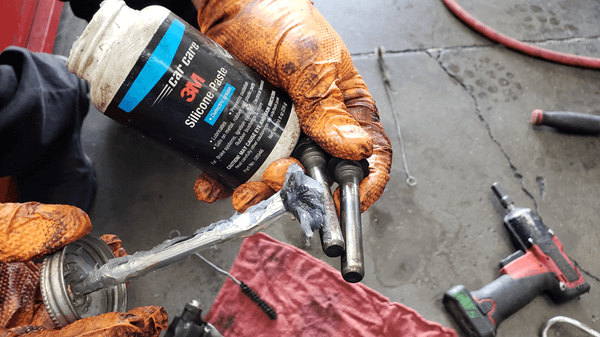 covered by dust boots. Lubricant anywhere else will only attract dust and dirt and cause problems in the future. Torque slide pins to the specification listed in the repair manual.
A note on lubrication: Anti-seize is not a brake lubricant. Only heavy silicone grease (semi-metallic and organic brake pads) or high-temperature brake lubricant (ceramic and high-performance brake pads) should be used on caliper slide pins, and only enough to do the job – less is more. Save a dab of anti-seize for the brake rotor center hole, but never apply to threads.
Installation Steps
With all parts cleaned and lubricated, you’re ready to put everything back together. Start by mounting the brake rotor – use a dab of anti-seize lubricant on the rotor center hole – following any index markings you made when checking rotor runout. Use one or two wheel nuts to hold the rotor in place. You might need to clean the rotor faces again.
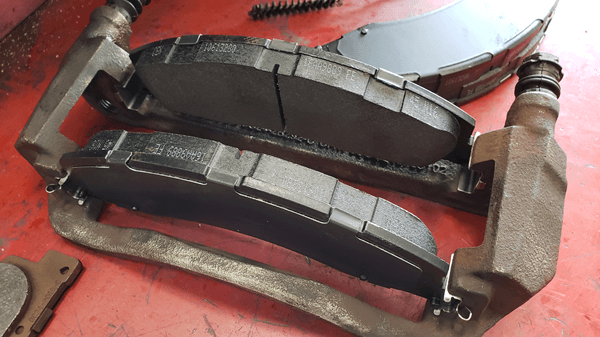 Install the brake pads in the brake caliper, remembering to install new spring clips, anti-rattle shims, and retainer springs in their places. Refer to your pictures or drawings to get everything in their proper places. Some brake pads have leading and trailing edges, or specific inboard and outboard designs, which must be installed in the proper direction of rotation. Pad wear indicators, “squealers,” should be installed on the inboard side, usually on the trailing edge.
Slip the assembled brake caliper and brake pads over the brake rotor and tighten mounting bolts finger tight. Torque each bolt individually. Some monoblock brake calipers have special instructions regarding which order to torque these bolts, so pay special attention to the repair manual instructions on this point. After installing the caliper, the wheel nuts can be removed.
Clean the wheel center hole and hub facing, the same way as you cleaned the wheel hub and rotor. This will ensure even clamping when the wheel is mounted. Mount the wheel and install the wheel nuts by hand. Then, torque the wheel nuts to the specification listed in the repair manual, following a star pattern. Overtightening, such as with an impact wrench, can deform the rotors and create runout problems, leading to pedal pulsation in the future.
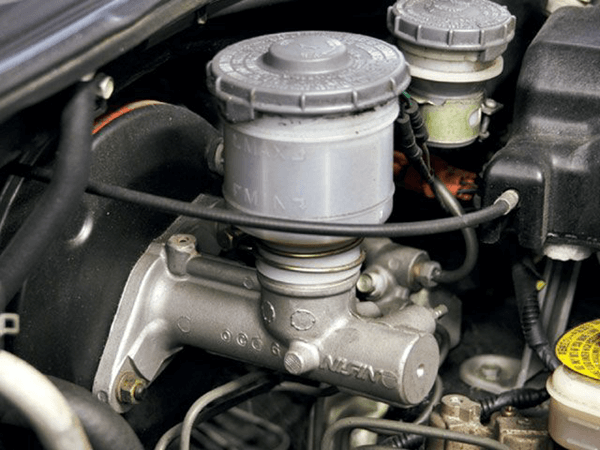
Top off the brake master cylinder reservoir with the correct brake fluid. Apply the brake a few times to compress the calipers, then recheck and top off the brake fluid if necessary, only to the “FULL” marking.
Most vehicles use DOT 3 brake fluid, but some vehicles, usually European and performance cars, may use DOT 4 or DOT 5. Caution, DOT 3 and DOT 4 can mix, but DOT 5 is incompatible with either of these, and will ruin your entire brake system, leading to costly repairs. If in doubt, read the repair manual.
Brake Break-In
Your final step, before driving your car as normal, is to break in your new brake pads and rotors, which is also called burnishing or “bedding in” brake pads. This ensures the brake pads are properly matched to the brake rotors, eliminating any ridges and imperfections between them. It also burns off any residue from manufacturing and installation.
Breaking in your brakes is simple – you just need a straight road with no traffic. Accelerate to about 30 mph, drive for about a minute – this is important, to let the brakes cool between each stop – then use moderate brake pressure to bring your vehicle to a stop. Repeat this step 15 to 20 times, then drive your vehicle as normal. Avoid heavy braking for the first few hundred miles.
Pat Yourself on the Back
Really, a brake job is not all that difficult. The difficulty comes in the double-checking, as your brakes are the most important feature on your car. If you have any questions, be sure to ask a trusted mechanic. Then, once you’re done replacing your brakes, take pride in the fact you did it yourself.
Book An Appointment